Build API Key Authentication in your Django REST application: Django, Django REST, Simple API Key, Docker


Depending on the needs of a web application you are working on, you might want to implement ApiKey authentication if you want certain entities to access some of your API resources. API authentication is great for the following cases:
Rate limiting: By requiring an API key, you can track and limit the number of requests made to their API by a single user or application.
Access control: API keys can restrict access to certain parts of an API, allowing you to control which endpoints and resources are available to different entities.
Monetization: API keys can be used to track usage and bill users based on the number of requests made to an API or the amount of data consumed.
If your needs for an authentication system don't fit the cases above, it is better to directly go with user authentication.
In this article, we will build a REST API that uses ApiKey authentication under the hood with the simple-apikey package**.**
Setup project
The first step is to create a virtual environment. I am working with Python3.11 for this article.
python3.11 -m venv venv
After creating the virtual environment, let's install Django and the required packages for the project.
pip install django djangorestframework-simple-apikey
This will install Django, Django REST framework, and the Django REST Framework Simple ApiKey package.
After that, create a new Django project.
django-admin startproject ApiKey .
A new project will be created. We then need to add a required configuration for the simple API key package. Let's register the rest_framework and the rest_framework_simple_api_key application in the INSTALLED_APPS in the settings.py file.
INSTALLED_APPS = [
    ...
    "rest_framework",
    "rest_framework_simple_api_key",
]
In the settings.py file of the project, add the following line at the end of the project.
SIMPLE_API_KEY = {
    "FERNET_SECRET": os.environ.get("FERNET_SECRET"),
}
It is a great habit to not have important keys written in plain text in the code. That is why we will be using env variables. The next step is to generate a fernet key and store it inside a .env file.
python manage.py generate_fernet_key
Store the output inside the .env file following this structure.
FERNET_SECRET=YOUR_GENERATED_FERNET_KEY
The project is ready and we can start coding.
Building a mini fintech project
The project of this article is quite simple. We will allow organizations to create payments. The request made to create a payment, list, or retrieve a payment are protected by Api Key authentication.
For the sake of simplicity, we will have a simple design for the tables and the resources of the API we are going to build. Thus, we won't add user authentication when we have to request to create an Api Key for an organization. I suppose that you have enough knowledge on how to implement user authentication, so we can focus on the API Key authentication in this article. :)
Note: If you want to learn more about JWT authentication with Django REST, you can read an article I have written about it here. It is a full-stack article with React, but the first part of the article focuses on Django and Django REST only.
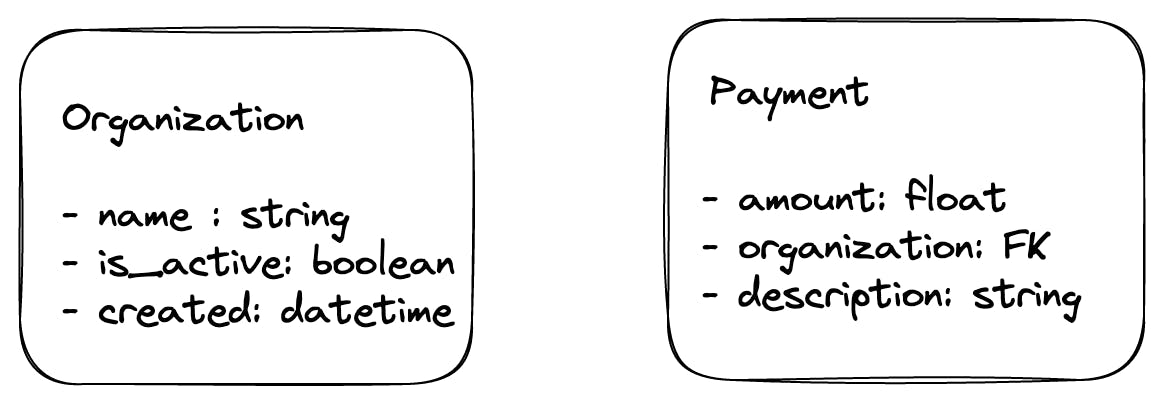
Here is the structure of the Organization and the Payment models.
And here are the routes for the API resources and their authentication system.
| Resource | Method | Route | Authentication |
| Create an API key for an organization | POST | /api/organization/create_api_key/ | None |
| Create a payment | POST | /api/payment/ | API Key |
| List payments for an organization | GET | /api/payment/ | API Key |
Let's start writing the API by creating the organization application first.
Organization application
Inside the Django project, run the following command to create a Django app called organization.
django-admin startapp organization
Once the application is created, register it in the INSTALLED_APPS in the settings.py file.
# ApiKey/settings.py
INSTALLED_APPS = [
    ...
    "rest_framework_simple_api_key",
    # my apps
    "organization",
]
After that, we can now write the Organization model in the organization/models.py file.
# organization/models.py
from django.db import models


class Organization(models.Model):
    name = models.CharField(max_length=255)
    created = models.DateTimeField(auto_now_add=True)
    is_active = models.BooleanField(default=True)
Let's also add a model that will extend the Api Key model used for authentication as recommended in the official documentation for custom behaviors.
# organization/models.py
...

from rest_framework_simple_api_key.models import AbstractAPIKey

...

class OrganizationAPIKey(AbstractAPIKey):
    entity = models.ForeignKey(
        Organization,
        on_delete=models.CASCADE,
        related_name="api_keys",
    )
After that, create a file called backends.py in the directory of the organization app. This file will contain the code for a custom authentication backend. We just need to tell the ApiAuthentication backend which model to use for authentication now.
# organization/backends.py

from rest_framework_simple_api_key.backends import APIKeyAuthentication
from organization.models import OrganizationAPIKey


class OrganizationAPIKeyAuthentication(APIKeyAuthentication):
    model = OrganizationAPIKey
Then, create a file called viewsets.py in the directory of the organization app. This file will contain the code for the OrganizationViewSet class which will just contain an action to create a new API key.
# organization/viewsets.py

from rest_framework import viewsets

from rest_framework.decorators import action

from rest_framework.response import Response
from rest_framework import status

from organization.models import OrganizationAPIKey, Organization


class OrganizationViewSet(viewsets.ModelViewSet):
    http_method_names = ["post"]
    queryset = Organization.objects.all()

    @action(methods=["post"], detail=True)
    def create_api_key(self, request, *args, **kwargs):
        organization = self.get_object()
        _, key = OrganizationAPIKey.objects.create_api_key(
            name="Org Api Key", entity=organization
        )

        return Response({"key": key}, status=status.HTTP_201_CREATED)
With the viewset added, we can register it using Django REST routers. At the root of the Django project, create a file called routers.py.
# ./routers.py

from rest_framework import routers

from organization.viewsets import OrganizationViewSet

router = routers.SimpleRouter()
router.register(r"organization", OrganizationViewSet, basename="organization")

urlpatterns = router.urls
And in the urls.py file of the Django project, register the routes of the router.
# ApiKey/urls.py

from django.contrib import admin
from django.urls import path, include

urlpatterns = [
    # path("admin/", admin.site.urls),
    path("api/", include(("routers", "api"), namespace="api")),
]
Great! We can now create migrations, run the migrations, and then start creating API keys for an organization.
python manage.py makemigrations
python manage.py migrate

python manage.py runserver
Before creating an API key, we need to have an organization in the database first.
Run the following command to open the Django shell and quickly create an organization.
python manage.py shell

> from organization.models import Organization
> o = Organization(name="Stripe Alike")
> o.save()
I assume that it is the first organization you are creating if you are following this article, so the pk of the organization will be 1. Let's make a POST request http://localhost:8000/api/organization/1/create_api_keys/ to create an API key.
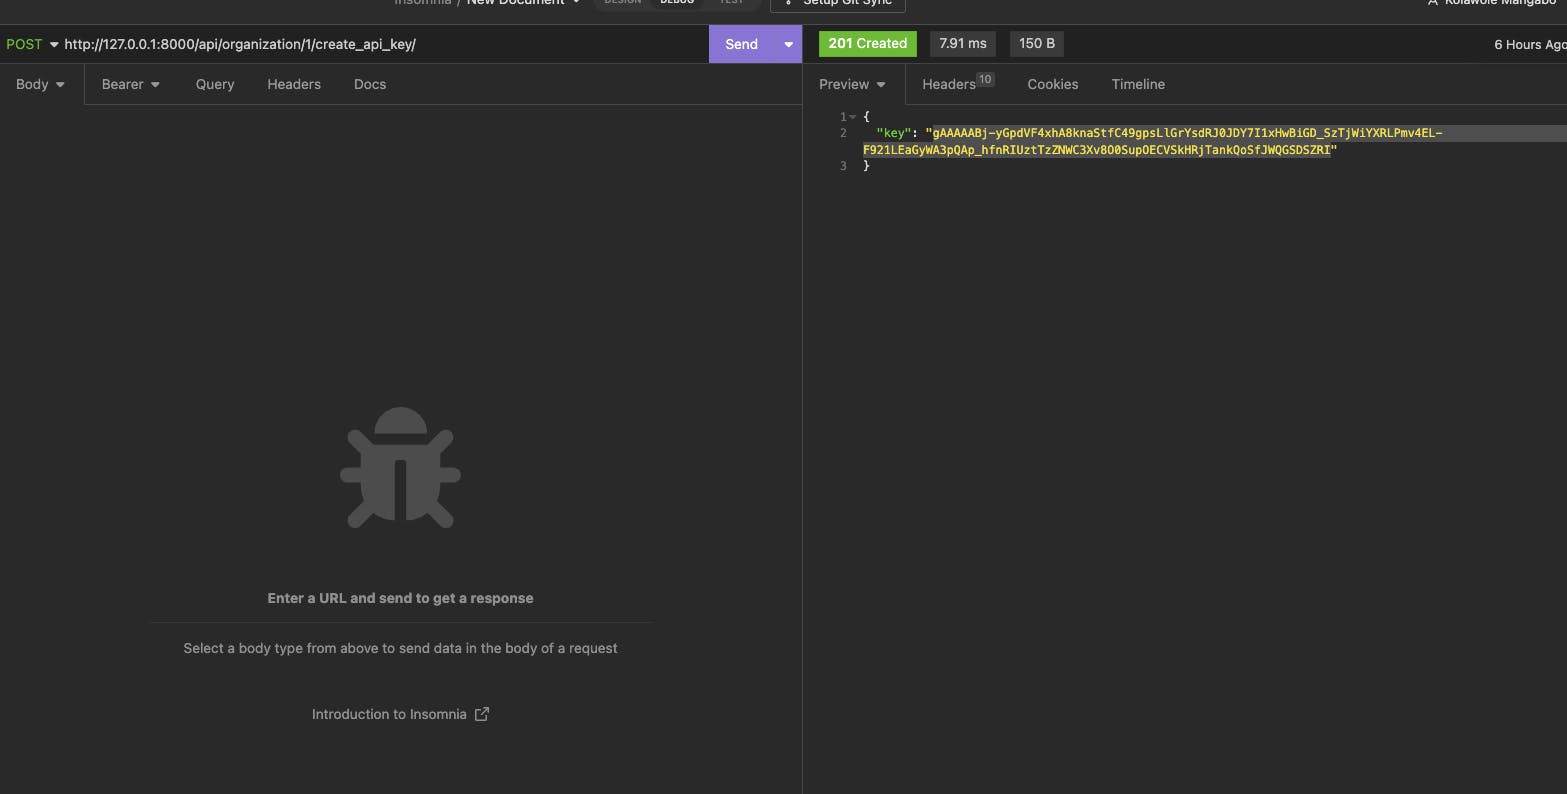
Save the value of the API Key somewhere as it will be used for requests on the Payments resources. Let's craft the application for the payment resource now.
Blazing fast payments
At the root of the Django project, run the following command to create an application called payment.
python manage.py startapp payment
Once the app is created, register it in the INSTALLED_APPS setting in the settings.py file of the project.
After that, let's write the Payment model.
# payment/models.py
from django.db import models


class Payment(models.Model):
    amount = models.FloatField()
    organization = models.ForeignKey(
        "organization.Organization", on_delete=models.CASCADE
    )
    description = models.TextField(max_length=1000)
With the model created, we can write a serializer class for thePayment model. Inside the directory of the payment application, create a file called serializers.py file. This file will contain the code for the PaymentSerializer class.
# payment/serializers.py
from rest_framework import serializers

from organization.models import Organization
from payments.models import Payment


class PaymentSerializer(serializers.ModelSerializer):
    organization = serializers.PrimaryKeyRelatedField(
        queryset=Organization.objects.all()
    )

    class Meta:
        model = Payment
        fields = "__all__"
Note: The
serializers.PrimaryKeyRelatedFieldis used when you want to represent a relationship between two models using primary keys. You can learn more here.
Next, we can add the viewsets for the payment app and this is where it becomes easy and interesting. Create a file called viewsets.py in the directory of the payment app.
# payment/viewsets.py
from rest_framework import viewsets
from rest_framework_simple_api_key.permissions import IsActiveEntity

from organization.backend import OrganizationAPIKeyAuthentication
from payments.models import Payment
from payments.serializers import PaymentSerializer


class PaymentViewSet(viewsets.ModelViewSet):
    http_method_names = ["get", "post"]
    authentication_classes = (OrganizationAPIKeyAuthentication,)
    permission_classes = (IsActiveEntity,)
    serializer_class = PaymentSerializer

    def get_queryset(self):

        return Payment.objects.filter(organization=self.request.user)
For the authentication_classes, we are using the custom OrganizationAPIKeyAuthentication backend. This will ensure that every request on this endpoint requires a valid API Key.
After that, we also have the permission_classes attribute which checks if the entity or proprietary of the API key is active. This class requires the entity model (in our case Organization) to have the is_active attribute, otherwise, you might encounter some bugs.
As a complete authentication system and following the Django way of doing authentication, the request.user is set to the entity, in our case an organization. We can then for example filter payments according to the organization asking for them.
We can register the PaymetViewSet in the routers.py file now.
# routers.py

from rest_framework import routers

...
from payments.viewsets import PaymentViewSet
...
router.register(r"payment", PaymentViewSet, basename="payment")

urlpatterns = router.urls
Great! Let's run the migrations commands and create payments.
python manage.py makemigrations
python manage.py migrate
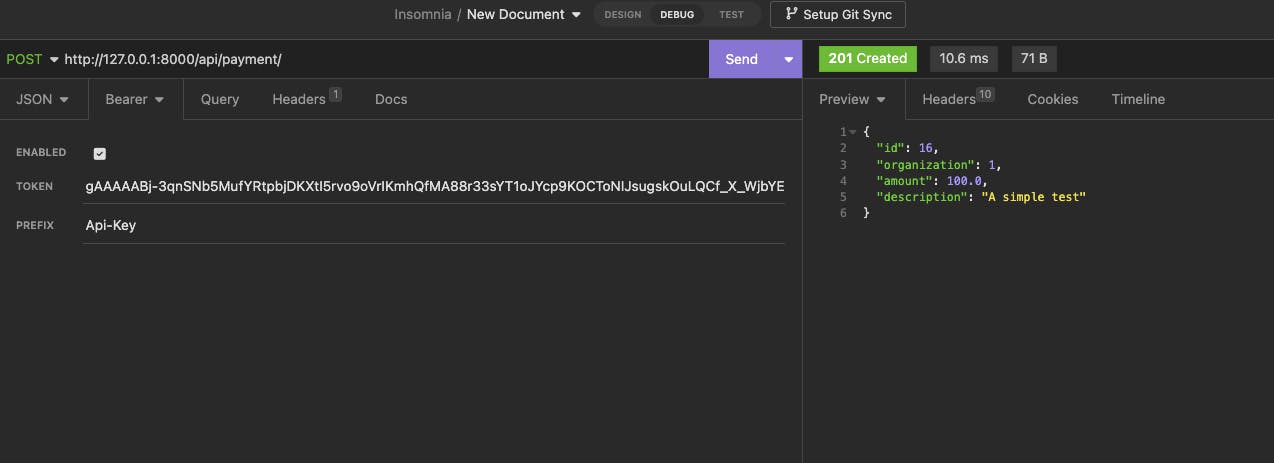
Use your favorite API Client to make requests. I am using Insomnia actually and the Authorization header is defined as follows 👇
Authorization: ApiKey <your-api-key>
Great 🚀! You have just learned how to build an API key authentication system using Django, Django REST, and Django REST Framework Simple API Key 🔐 package.
As a bonus, I am adding a small section on how to dockerize the application we have created.
Dockerizing the application
Ensure that you have Docker installed on your machine. Once it is done, create a file called Dockerfile at the root of the project. This file will describe the steps needed to create an image that will be used by Docker to successfully run the project above in a container.
FROM python:3.11-alpine

WORKDIR app/

ENV PYTHONDONTWRITEBYTECODE 1
ENV PYTHONUNBUFFERED 1


# install python dependencies
COPY requirements.txt /app/requirements.txt
RUN pip install --upgrade pip
RUN pip install --no-cache-dir -r requirements.txt

# run migrations

RUN pip install --no-cache-dir -r requirements.txt

COPY . /app

EXPOSE 8000

CMD ["python", "manage.py", "migrate"]
CMD ["python", "manage.py", "runserver", "0.0.0.0:8000"]
You can then build and run the Dockerfile with the following commands 👇
docker build -t django-api-key .

docker container run -p 8000:8000 django-api-key --env-file=.env
The project will start running at localhost:8000. 🚀
Conclusion
I hoped this article was helpful for you and it can get you started with API key authentication in your Django REST projects. If you think that this article could have been made better, feel free to comment below.
Also, you can check the code source of the project of this article on GitHub.
Ready to take your Django and React skills to the next level? Check out my book, Full Stack Django and React: Get hands-on experience in full-stack web development with Python, React, and AWS, for an in-depth guide to building web applications with these powerful tools. Whether you're a beginner or an experienced developer, you'll find practical tips and insights to help you succeed. Click here to order your copy now!"